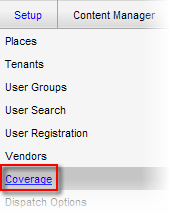
1. Click Control Panel > Setup > Coverage
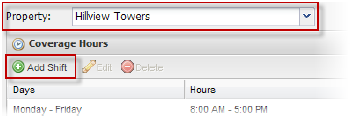
2. Select the desired Property from the drop-down menu. The Shifts screen is updated to display all shifts associated with the property you have selected; if you have not set up any shifts yet, this list will be empty.
3. Click the Add Shift button.
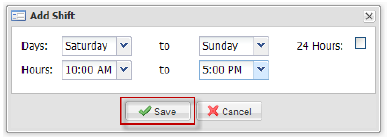
4. A pop-up window will open, allowing you to configure the new shift.
5. Use the Days drop-down lists to select the days that the shift covers.
6. Use the Hours drop-down lists to select the start and end time for the specified days. If this is a 24-hour shift, click the 24 Hours checkbox instead.
7. Click Save to save the shift.
Notes:
• Dispatching only occurs during coverage hours.
• Requests dispatched in off hours will appear on the Outstanding list unless after hours routing is required.
• Change for statutory holidays.
• Escalation only occurs during coverage hours.
• Hours are determined by shifts.
• Shifts cannot overlap.