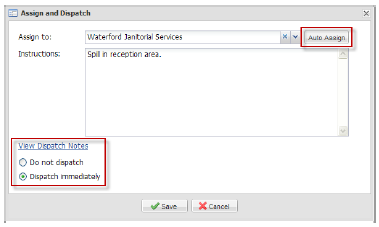
1. The Assign and Dispatch section has two fields: Assigned To and Instructions. To modify this information, click the Edit link. A popup window will open.

2. You can assign (or re-assign) the work order by either using the drop-down menu provided, or by clicking Auto-Assign. The auto-assign feature uses your routing table to determine the tradesperson or vendor that should be assigned to the work order.
3. You can also add or modify the instructions that will appear on the work order. By default, this text will be identical to the Description field in the Work Order Details section, located to the bottom-left of the work order.
Note:
• Modifying the Instructions field does not alter the Description field in the Work Order Details section.
4. The Dispatch Notes link displays any dispatch notes associated with the property or Request Type. Dispatch notes are not displayed on work orders; they are meant to help provide guidance when assigning work orders. To see the dispatch notes, move your mouse over the link; the notes will appear in a tool tip.
5. If an assignment was made Dispatch Immediately will be selected by default. If you want to assign the work order but not dispatch it for the moment, select Do not dispatch.
6. Click Save. If you selected Dispatch immediately, the work order will be dispatched.
