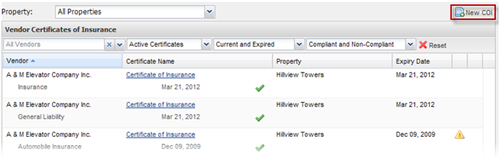
1. Click Control Panel > Work Order > COI > Tenants

2. The Certificates of Insurance page is displayed. Click New COI.
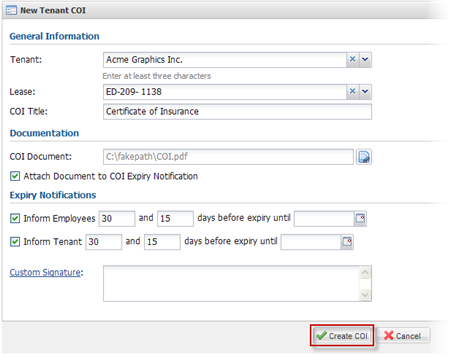
3. The new Tenant COI page is displayed.
4. Select a Tenant. You can search for the tenant by entering at least three characters of the Tenant's name and selecting from a list of possible matches provided.
5. Choose the applicable lease from the drop-down list.
6. Enter a COI title.
7. Add a COI document to upload by clicking the browse button ( ) and selecting the file on your computer in the browse interface.
8. If you do not want this document to be attached to expiry notifications, remove the checkmark beside Attach Document to COI Expiry Notification.
9. In the Expiry Notifications section, place or remove checkmarks beside Inform Employees and Inform Tenant as applicable.
• For each of the above options, you can select two dates prior to expiry to send notifications; the default settings a 30 and 15 days. If you do not want a second set of expiry notifications to be sent, leave the second box empty.
• In the ...days before expiry until section, click the calendar icon ( ) and use the menu provided to enter a hard date after which expiry notifications will no longer be sent; you can leave this section empty if you do not want to stop sending automatic notifications.
10. If you would like to add a custom signature, you can enter one in the Customer Signature text box provided.
11. Click Create COI to create the COI.
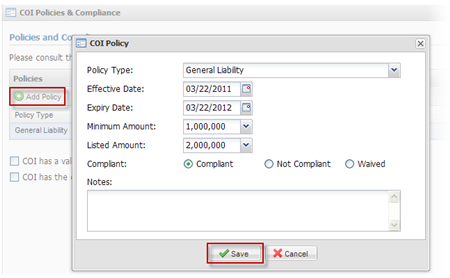
12. The COI Policies & Compliance section is displayed.
13. To add a policy, click Add Policy and fill in the following information:
• Policy Type
• Effective Date
• Expiry Date (default is 1 year after Effective date, this can be overridden)
• Minimum Amount (the minimum amount required for the policy to be compliant. You can select an amount from the dropdown or type in a specific amount.)
• Listed Amount (the actual amount provided by the policy. You can select an amount from the dropdown or type in a specific amount.)
• Select one of the following compliancy options:
• Compliant
• Not Compliant
• Waived (use this option to manually override non-compliancy. This should only be used in special circumstances where compliancy has been intentionally exempted by your company.)
• Notes
14. Click Save when you are finished.
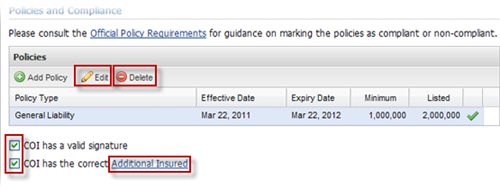
15. You can continue adding policies as described above; you can also edit or delete policies you have added by selecting the Policy and clicking Edit or Delete, as applicable.
16. Place a checkmark beside COI has a valid signature to indicate the signature is valid.
17. Place a checkmark beside COI has the correct Additional Insured if this is correct. You can click on the underlined Additional Insured text to see if this is true.
18. When you are done click Finish, located at the bottom of the page. You will be taken to the COI Details page. For more information see Editing COI Information.