|
|
|
|
|
|
|
| |
Control Panel > Work Order > Property Inspection Checklists
Adding Checklists:
There are two main steps to creating a Checklist: 1. Create a Checklist Template and 2. Generate Checklist. See About Property Inspection Checklists for more information. Creating a Checklist Template involves adding content into two levels: Level One - Categories and Level Two - Checklist Items. See Step #4 below for a further explanation.
Note:
-
Multiple checklists may be generated from a Checklist Template now or at a future date, if necessary.
- If you wish to create another checklist from an existing Template, skip to Step #6.
-
Click Control Panel > Work Order > Property Inspection Checklists.

-
Click Add under the Checklist Template section.

-
Enter the Checklist Attributes:
- Title
-
Location (e.g. Building Interior, Parking Garage, Building Exterior, etc.)
-
Description
-
Monthly Tickler Notification (optional): Will email a notification to all Non-Tenant users with the Checklist Notification email subscription enabled in their user profiles.
-
Checklist Type: Simple (checkboxes) or Good/Fair/Poor Rating

-
Add Checklist Contents.
- Click Add under the Unapplied Contents section.

-
Enter the Name of the new content.
-
Click Add Content.

-
The new content will be added to the Unapplied Contents section. Select the newly created/ desired content(s), and click and drag to the appropriate section of the Checklist Contents section.

Note:
-
Two levels, as seen above, must be added to the Checklist Contents for a
generated checklist to work. Level One is the Category, and Level Two
is the Checklist Item.
-
Click Submit once finished. The newly created Checklist criteria will be displayed as a new Checklist Template.
-
To create a functional checklist, locate the desired Checklist Template, and click Generate.

-
The newly generated checklist will display under the Open/ Generated Checklists section. Refer to Using Generated Checklists for more information.
-
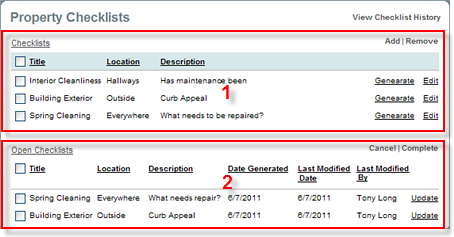
Checklist Templates
- Generated Checklists
|
|
Last Updated: September 04, 2018
|
|
|
|
|