|
|
|
|
|
|
|
| |
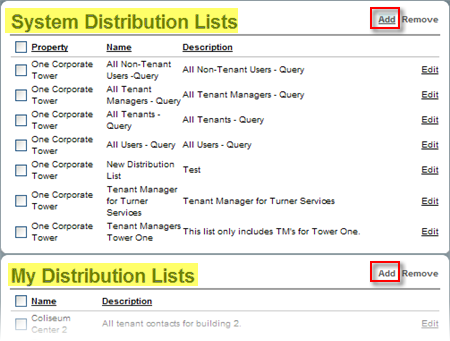
Control Panel > Communication > Distribution List
Creating a Distribution List:

- Go to Control Panel > Communication > Distribution List.
- Click on Add on the top right of the System Distribution Lists or My Distribution Lists.
Note:
- By default, the System Distribution Lists displays the lists created by Axis Portal upon the initial setup of your portal as well as any other general user group distribution lists.
- Distribution Lists added under System Distribution Lists will be available for all staff users for that property.
- The My Distribution Lists is a separate section used to organize customized lists at your discretion. Distribution Lists added under My Distribution Lists will be only be available to the user who created that list.
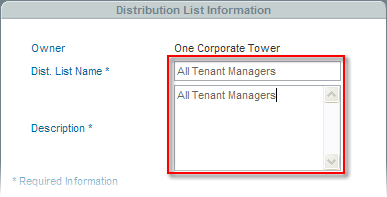
- Under Distribution List Information, add a Distribution List Name and Description.
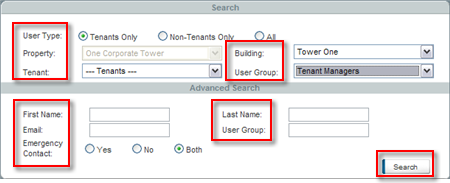
- In order to add users to your distribution list, first conduct a search for members and/or queries using the Search section in the upper right-hand corner.
- A search can be run according to User Type, Property, Building, Tenant, User Group, Name, Email, User Group String, and/or Emergency Contact Settings.
Note:
- Leaving the search options blank dismisses the filter and displays all users within that criterion.
- Click on Search.
- The Search Results are displayed below according to Last Name, First Name, Email, Phone Number, Emergency Contact, Tenant, and Tenant User Status.
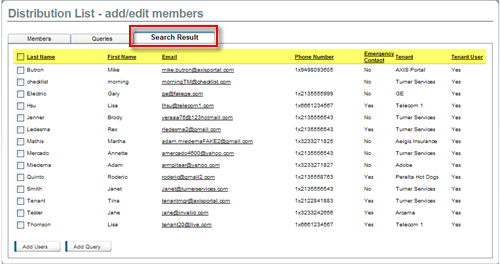
- To manually add individual members to the Distribution List, select the desired users and click on Add Users. The users will be added and displayed under the Members tab.
Note:
- Manually adding individual users to the Distribution List means that if a user is decommissioned in the future, that user must manually be removed from the list.
- Adding a Query (as noted in Step #9) instead of manually adding individual users adds the Search settings to the Distribution List and will automatically update according to the specified search criteria.
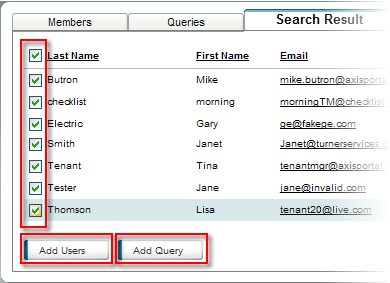
- To add users to the Distribution List that will automatically update according to the specified search criteria, click on Add Query. The query will be added and displayed under the Queries tab.
Note:
- Adding a Query means that the Search settings will be added to the Distribution List.
- By adding a Query instead of manually adding individual users (as noted in Step #8), updates to User Groups and/or Tenants (i.e. employee termination, decommission, new hire, etc.) will automatically add or remove users from the Distribution List.
- Click on Save.
|
|
Last Updated: October 10, 2016
|
|
|
|
|